18.09.2012:
at 8am we went straight to eshed and we went on computers and done some assessment catch up til 9am then matt gave us a worksheet of a saw horse and gave us a quick run down with them then we got the tops then went into joinery class and we used the straght edge machine and also the thicknesser.
and then we back into eshed to make a start on the saw horses cutting out the slots for legs and i just done measurements and also markings then at 10am we had first break til 10.20am.
then we went back and then me brenden john and tom went into joinery class too use the grinders to sharpen the chisels.then after that we went back too eshed to cut out slots for the legs of the saw horses.
then at 11.50am we got told after lunch we were going on a little trip for timber terminology after lunch at 12.50pm. then we went down til 3pm and then went home.
Wednesday, 19 September 2012
Saturday, 15 September 2012
12.09.2012.
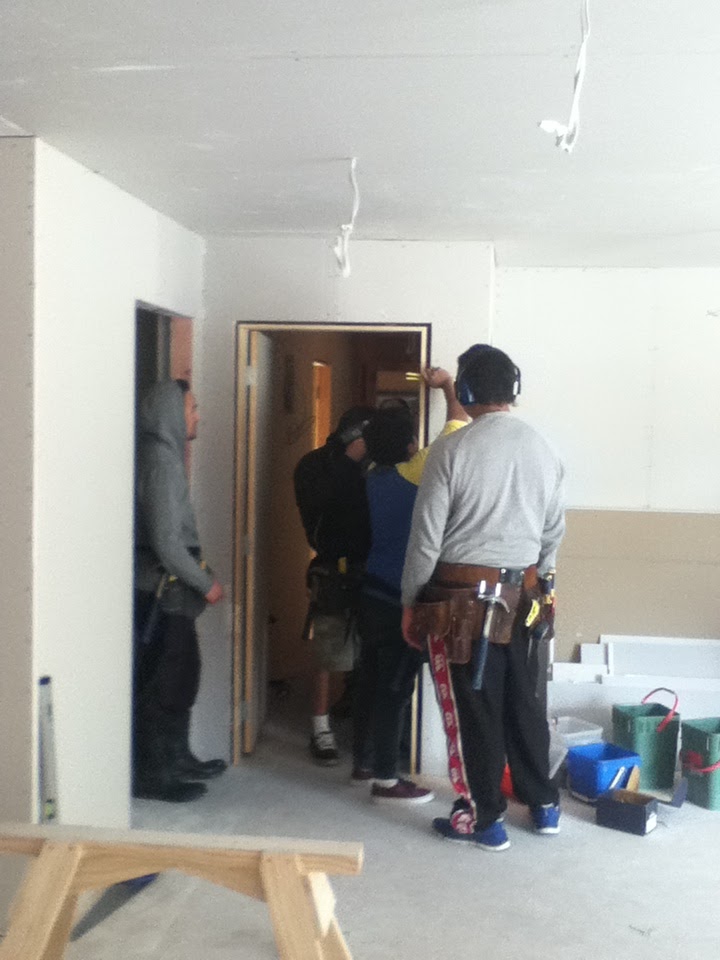
at 8am we went straight to the e shed and went on the computers to do some assessment til 9am then matt told us we were installing the interior doors and gave us the steps we should follow.
Steps on an interior door:
1./ Check floor for level
2./ Check openings/ Door size
3./ Position door in centre
4./ Pack hinge side to plumb
4 packers
5./ dry fit door - Check tollerances - gap width adjust in necessary
6./ screw hinge jamb off
- jamb should be flush with the gib
7./ pack openings jamb, maintaining a 2-3mm gap
8./ fix remainer of jamb
then matt showed us how too install the first door in the lounge room so we had an idea on how to do it.
then at 10am we had first break til 10.20am then we back to the work shop and carried on doing the interior door insulation til 12pm then had lunch break til 1pm then me tucky and tk started on the sliding doors for the wallrope in entrance way. then at 2.50pm we had a quick house clean up til 3pm then had last break til 3.20pm then went back to workshop and done blogging til 4.30pm.


 |
| screwing in interior door |
 |
| tuckie drilling |
 |
| tuckie drilling |
 |
| dyran and tuckie installing the first interior door |
 |
| tuckie drilling |

 |
| tuckie screwing in the door jamb |

 |
| same as before |
 |
| the first 2 doors installed |
 |
| the hall way with doors installed |
 |
| tk checking if wall is level |
 |
| same as before |
 |
| the start of wallrope door |
Tuesday, 11 September 2012
11.09.2012.
at 8am we went too classroom upstairs and matt went over the interior linings with us.
Noiseline:
Gib noiseline is used as a double layer
standard Gib is pretty much used for everything.
fyreline:
has a high density core which resists exposure to fire to fire longer than standard gib
provides up to four hours fire protection.
types of gib:
standard
ultraline
fyreline
brace
aqualine
alternative interior linings:
type of linings:
plywood
masonry/stone
chip board/particle/OSB
coratone
hardie glaze
pinex
squd plaster
timber panel
plywood:plywood is available in species and finishes.
plywood is very tough
plywood can be used to line walls
used for floors
used to build kitchen cabinetry
MDF- Medium- density fibreboard
MDF is a very high product finish resistant to impact than drywall.
mainly used for kitchen cabinetry.
don't use for bathrooms or laundry.
fibre cement sheet:
is very resistant to moisture and decay.
used mainly for outside materials.
sheets can be produces in tapered measures.
can be also used as masonry substrate.
fibre cement sheet is produced in different dimensions and thicknesses.
soffit linings = 4.5mm
wet areas = 9mm (interior linings)
exterior substrate = 4.5mm
weatherboards = 18mm
compressed sheet = 18mm
fibrous plaster:
gypsum plaster cast in sheets, cornices, corbels etc.
tounge and groove:
used to line ceilings, floors, walls and kitchen cabinetry.
sarking board:
a thin board of wood used for sheadings.
the sarking was covered in news papers.
may stop drafts.
then at 9am we went to eshed and got ready to go in workshop and me and justin carried on doing the lounge gibs on the wall til 10am then had first break til 10.20am then went back and carried on wall gibs and justin taught me how too use a electric screw gun properly. then at 12pm we had lunch break til 1pm then we went back and started the last wall gib in the lounge til we ran outer long sheets of gib. then after that we done a quick clean up of the house til 3pm then had last break til 3.20pm then went too eshed got computers and done blogging and i left early with brenden at 4pm to go home.


the above pictures are of what the inside of the house looks like at the moment..
 |
| tk putting up side wallrope gib for the wall.. |
 |
| tuckie screwing up wallrope wall gib |
 |
| tk cutting the gib with the gib knife/saw to cut to line up the wall lining. |
Sunday, 9 September 2012
10.09.2012.
at 9am we went too the eshed and matt gave us a worksheet a pre inspection sheet.
we filled that out then had first break from 10am til 10.20am then we went back to eshed and went straight to the workshop and we carried on with the wall gibs in the lounge.
til 12pm then at 12pm we had lunch break til 1pm then after that we went back into workshop and carried on with the lounge wall gibs til 2.50pm then had a quick clean up til 3pm then had last break til 3.20pm then went too eshed and we done the alternative wall cladding calculations with matt til 4.30pm.then went home.


 |
| pre inspection sheet 1/1 |
 |
| pre inspection sheet 1/2 |
 |
| corner mould peice for windows.. |
Thursday, 6 September 2012
05.09.2012.
at 8am we went to e-shed and we got the computers out and we done some assessment catch up til 10am then after that we had first break til 10.20am then after that we went too workshop and started installing the wall gib in the lounge til 12pm then had lunch break til 1pm then went back to the the workshop carried on doing wall gibs in lounge til 3pm then had last break til 3.20pm then went back to workshop and carried on with the same til 4.20pm then had quick clean up then home time.
at 8am we went to e-shed and we got the computers out and we done some assessment catch up til 10am then after that we had first break til 10.20am then after that we went too workshop and started installing the wall gib in the lounge til 12pm then had lunch break til 1pm then went back to the the workshop carried on doing wall gibs in lounge til 3pm then had last break til 3.20pm then went back to workshop and carried on with the same til 4.20pm then had quick clean up then home time.
 |
| mark showing us how to do the nailing and measurements for the gib |
 |
| mark showing us how to glue sheets of gib up |
 |
| mark showing us the way to screw up the wall gib when going up vertical |
 |
| first sheet installed |
 |
| wallrope gib installed |
 |
| brendon installed wall rope gib |
 |
| e-jay screwing up the wall gib |
 |
| e-jay placing the gib in place |
 |
| wall gib installed |
 |
| darryn glueing |
 |
| switch slot |
 |
| two switches slots |
 |
| switch slot |
 |
| calculations for the light switches |
Subscribe to:
Posts (Atom)